PXE引导部署Ubuntu
1 背景信息
服务端操作系统为 Ubuntu20.04
安装的镜像为Ubuntu-20.04-live-server-amd64
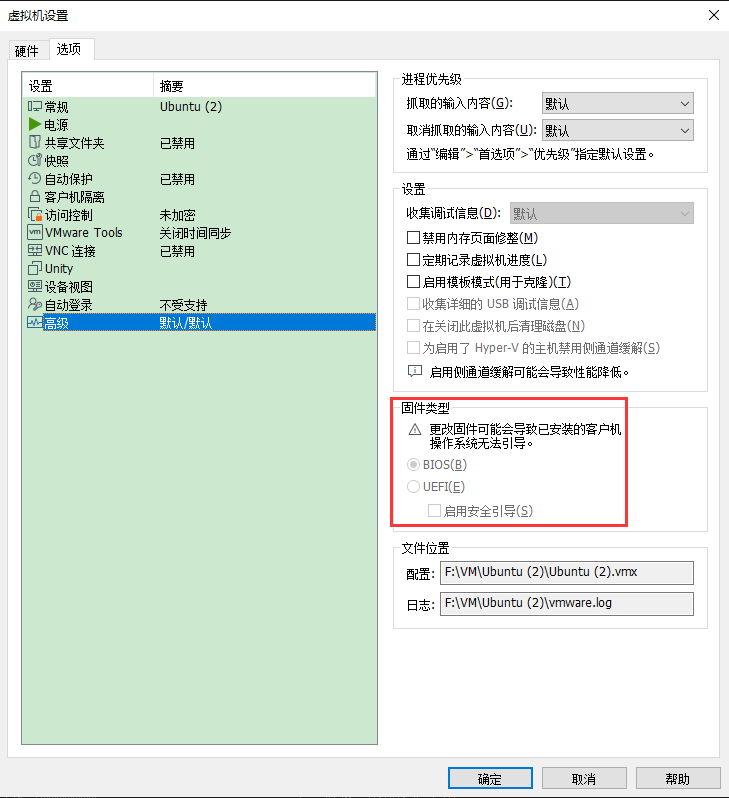
如果是虚拟机操作,需要注意网络适配器的选择,避免与局域网冲突
2 服务端配置
2.1 安装dnsmasq
dnsmasq同时实现了DHCP、TFTP、DNS三种服务器
apt install -y dnsmasq如出现以下错误,关闭resolve并重新启动dnsmasq
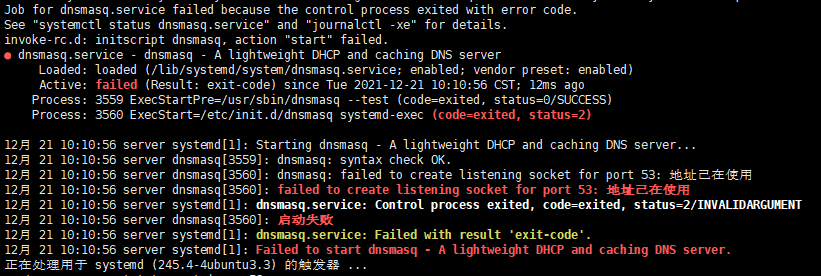
systemctl stop systemd-resolved.service && systemctl disable systemd-resolved.service
systemctl enable --now dnsmasq.service
2.2 创建TFTP 文件夹
TFTP 文件夹是TFTP服务的根目录,PXE启动过程中下载的文件都存在在该目录中
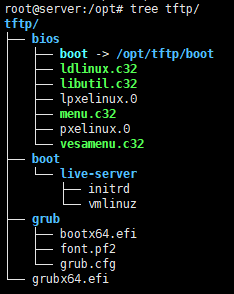
mkdir -p /opt/tftp/{boot/live-server,bios,grub}2.3 配置dnsmasq
dnsmasq的默认配置文件为/etc/dnsmasq.conf,关键配置有以下几个
配置DHCP 地址段 配置引导文件目录 配置tftp 根目录 配置日志路径 配置服务网卡,多网卡机器需关注
tee > /etc/dnsmasq.conf << 'EOF'
# 配置外网DNS服务器地址
server=114.114.114.144

# 指定服务的网卡
interface=ens33,lo

# 绑定端口
bind-interfaces

# 设置DHCP分发IP端范围、地址掩码、IP地址有效时间
dhcp-range=192.168.100.100,192.168.100.150,255.255.255.0,12h

# 指定网关地址   和安装无关,应该可以不配置
dhcp-option=3,192.168.100.1

# 指定DNS服务器地址  和安装无关,应该可以不配置
dhcp-option=6,114.114.114.114

# 设置引导程序相对tftp根目录的路径
dhcp-boot=/bios/pxelinux.0,pxeserver,192.168.100.1
dhcp-match=set:efi-x86_64,option:client-arch,7
dhcp-boot=tag:efi-x86_64,grub/bootx64.efi

# 打开tftp服务
enable-tftp

# 设置tftp根路径
tftp-root=/opt/tftp

# 设置日志路径
log-facility=/var/log/dnsmasq.log
EOF
修改resolv.conf,否则可能出现ping不通域名
echo 'nameserver 114.114.114.114' >> /etc/resolv.conf重启dnsmasq
systemctl restart dnsmasq.service安装HTTP服务器
apt install -y nginx2.4 下载pxelinux包
wget https://mirrors.edge.kernel.org/pub/linux/utils/boot/syslinux/syslinux-6.03.zip
unzip syslinux-6.03.zip -d syslinux
2.5 下载UEFI包
下载uefi 引导文件shim.signed、grub-efi-amd64-signed安全启动链加载的引导程序
apt-get download shim.signed
dpkg -x shim-signed_1.40.7+15.4-0ubuntu9_amd64.deb shim
apt-get download grub-efi-amd64-signed
dpkg -x grub-efi-amd64-signed_1.167.2+2.04-1ubuntu44.2_amd64.deb grub
2.5.1 配置bios文件夹
cp /root/syslinux/bios/com32/elflink/ldlinux/ldlinux.c32  /opt/tftp/bios
cp /root/syslinux/bios/com32/libutil/libutil.c32  /opt/tftp/bios
cp /root/syslinux/bios/com32/menu/menu.c32  /opt/tftp/bios
cp /root/syslinux/bios/com32/menu/vesamenu.c32  /opt/tftp/bios
cp /root/syslinux/bios/core/pxelinux.0  /opt/tftp/bios
cp /root/syslinux/bios/core/lpxelinux.0  /opt/tftp/bios
2.5.2 配置grub文件夹
拷贝引导文件到tftp目录
cp grub/usr/lib/grub/x86_64-efi-signed/grubnetx64.efi.signed /opt/tftp/grubx64.efi
cp shim/usr/lib/shim/shimx64.efi.signed /opt/tftp/grub/bootx64.efi下载系统镜像,需要注意的是只有live版本才能支持subiquity
从镜像复制两个文件,后面会用到
cp /media/boot/grub/font.pf2 /opt/tftp/grub
cp /media/boot/grub/grub.cfg /opt/tftp/grub
2.5.3 配置boot文件
挂载镜像
mount ubuntu-20.04.3-live-server-amd64.iso /media看到mount: /media: WARNING: device write-protected, mounted read-only.提示不影响
拷贝内核镜像文件
cp /media/casper/initrd /opt/tftp/boot/live-server
cp /media/casper/vmlinuz /opt/tftp/boot/live-server
创建引导文件夹的软链接
还需要创建一个指向/opt/tftp/boot文件夹的软链接
ln -s /opt/tftp/boot /opt/tftp/bios/boot2.6 配置IP地址
略
2.7 创建 Web 文件夹
mkdir /var/www/html/{iso,autoinstall}
说明
autoinstall 目录存放参数自动配置文件,user-data、meta-data是cloud-init要求的文件名
iso 目录存放 操作系统镜像文件
2.7.1 创建参数自动配置文件
先创建空文件,meta-data无需修改,user-data后续章节会详细描述配置
touch /var/www/html/autoinstall/user-data
touch /var/www/html/autoinstall/meta-data
复制镜像文件
cp ubuntu-20.04.3-live-server-amd64.iso /var/www/html/iso2.8 配置pxelinux.cfg和grub.cfg文件
需要在/tftp/bios文件夹下创建名为pxelinux.cfg的文件夹。
2.8.1 创建 pxelinux 配置文件
mkdir /opt/tftp/bios/pxelinux.cfg在此文件夹中,创建一个名为 default 的空文件**。**此文件控制 pxelinux 行为。
tee > /opt/tftp/bios/pxelinux.cfg/default << 'EOF'
DEFAULT menu.c32
NU TITLE ULTIMATE PXE SERVER - By Griffon - Ver 2.0
PROMPT 0
TIMEOUT 0

MENU COLOR TABMSG 37;40 #ffffffff #00000000
MENU COLOR TITLE 37;40 #ffffffff #00000000
MENU COLOR SEL 7 #ffffffff #00000000
MENU COLOR UNSEL 37;40 #ffffffff #00000000
MENU COLOR BORDER 37;40 #ffffffff #00000000

LABEL Ubuntu Server 20.04.1
kernel /boot/live-server/vmlinuz
initrd /boot/live-server/initrd
append ip=dhcp ds=nocloud-net;s=http://192.168.100.1/autoinstall/user-data url=http://192.168.100.1/iso/ubuntu-20.04.3-live-server-amd64.iso
EOF
2.8.2 创建 grub 配置文件
tee > /opt/tftp/grub/grub.cfg << EOF
if loadfont /grub/font.pf2 ; then
        set gfxmode=auto
        insmod efi_gop
        insmod efi_uga
        insmod gfxterm
        terminal_output gfxterm
fi

set menu_color_normal=white/black
set menu_color_highlight=black/light-gray
set timeout=5

menuentry "Ubuntu server 20.04 autoinstall" {
        set gfxpayload=keep
        linux  /boot/live-server/vmlinuz root=/dev/ram0 ramdisk_size=1500000 ip=dhcp url='http://192.168.100.1/iso/ubuntu-20.04.3-live-server-amd64.iso' autoinstall ds=nocloud-net\;s=http://192.168.100.1/autoins
tall/ ---
        initrd /boot/live-server/initrd
}
EOF
menuentry 之前是配置样式,也可以删除,重点关注menuentry "Ubuntu server 20.04 autoinstall"
内的配置。
指定镜像文件相对于tftp根目录的路径
/boot/live-server/initrd
root=/dev/ram0 ramdisk_size=1500000为了指定内核镜像挂载空间,是否可删除待确认ip=dhcp 指定内核镜像挂载后使用DHCP 获取IP地址
url= 指定ISO文件的网络存放路径
autoinstall ds=nocloud-net\;s=http://192.168.100.1/autoinstall/ ---该配置指明参数自动填写,并指明配置文件所在路径由于UEFI启动使用了grub,grub将
;识别为了特殊字符,所以要在;前加\转义。
2.9 配置user-data
这个文件是我基于已经安装好的Ubuntu修改的配置(用不了报错,原因未知)
文件路径位于/var/log/installer/autoinstall-user-data
#cloud-config
autoinstall:
  apt:
    geoip: true
    preserve_sources_list: false
    primary:
    - arches: [amd64, i386]
      uri: https://mirrors.tuna.tsinghua.edu.cn/ubuntu
    - arches: [default]
      uri: https://mirrors.tuna.tsinghua.edu.cn/ubuntu-ports/
  user-data:
    timezone: Asia/Shanghai
  identity:
   username: ubuntu
   hostname: server
   password: "$6$exDY1mhS4KUYCE/2$zmn9ToZwTKLhCw.b4/b.ZRTIZM30JZ4QrOQ2aOXJ8yk96xpcCof0kxKwuX1kqLG/ygbJ1f8wxED22bTL4F46P0"
   #The crypted password is just “ubuntu”.
  kernel:
    kernel: {package: linux-generic}
  keyboard: {layout: us, toggle: null, variant: ''}
  locale: en_US.UTF-8
  network:
    ethernets:
      ens160: {dhcp4: true}
    version: 2
  ssh:
    allow-pw: true
    authorized-keys: []
    install-server: true
  storage:
    config:
    - {ptable: gpt, path: /dev/sda, wipe: superblock-recursive, preserve: false, name: '',
      grub_device: true, type: disk, id: disk-sda}
    - {device: disk-sda, size: 1048576, flag: bios_grub, number: 1, preserve: false,
      grub_device: false, type: partition, id: partition-0}
    - {device: disk-sda, size: 42946527232, wipe: superblock, flag: '', number: 2,
      preserve: false, grub_device: false, type: partition, id: partition-1}
    - {fstype: ext4, volume: partition-1, preserve: false, type: format, id: format-0}
    - {path: /, device: format-0, type: mount, id: mount-0}
  updates: security
  version: 1
密码需要加密,可以先用工具对自己的密码进行加密后填入
代理不是必须的配置,与网络拓扑有关
磁盘分区配置要注意,配置不对会导致自动安装走不下去,提示crash。磁盘大小以及对应分区都要调整
安装过程日志在
/var/log/installer/,如果安装失败可以通过nc 等工具实时发出去
3 开启客户机
如果正常,应该显示如下结果
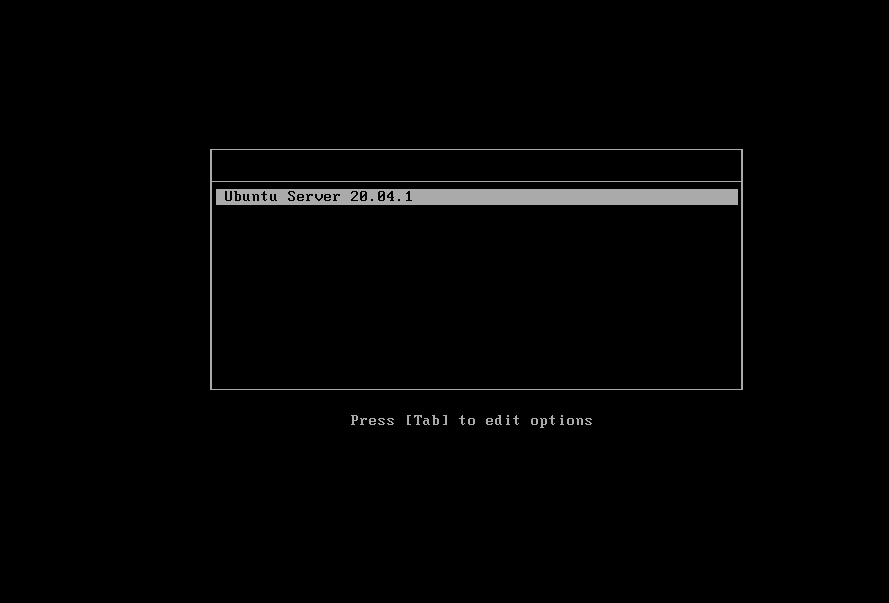
以上是BIOS引导,UEFI引导虚拟机里面无法选择
错误提示:wget: short write: No space left on device
这种提示不是磁盘空间不足,增加内存就可以了。
参考链接:
Ubuntu 20.04 – Deploy Ubuntu 20.04 Server through PXE (BIOS & UEFI)