FastDFS安装

FastDFS是开源的高性能分布式文件系统(DFS)。主要功能包括:文件存储、文件同步和文件访问,以及高容量和负载均衡设计。
1 软件准备
FastDFS:V6.12.2
libfastcommon:V1.0.75
libserverframe:V1.2.5
fastdfs-nginx-module:v1.24
Nginx:V1.28.0
2 安装依赖
apt-get install -y ca-certificates build-essential libpcre3 libpcre3-dev zlib1g zlib1g-dev libssl-dev wget git3 编译 libfastcommon
3.1 下载源码
git clone -b V1.0.75 https://github.com/happyfish100/libfastcommon.git --depth 13.2 编译
cd libfastcommon
./make.sh && ./make.sh install
4 编译libserverframe
4.1 下载源码
git clone -b V1.2.5 https://github.com/happyfish100/libserverframe.git --depth 14.2 编译
cd libserverframe
./make.sh && ./make.sh install
5 编译 FastDFS 服务
5.1 下载源码
git clone -b V6.12.2 https://github.com/happyfish100/fastdfs.git --depth 15.2 编译安装
cd fastdfs
./make.sh && ./make.sh install
5.3 配置 tracker
复制一份配置文件
cp /etc/fdfs/tracker.conf.sample /etc/fdfs/tracker.conf创建 tracker 文件夹
mkdir -p /opt/fastdfs/tracker修改配置文件
vi /etc/fdfs/tracker.conf# base_path 目录地址(根目录必须存在,子目录会自动创建)
base_path=/opt/fastdfs/tracker
# 系统预留空间,当一个group中的任何storage的剩余空间小于定义的值,整个group就不能上传文件了
reserved_storage_space = 10G5.3.1 启动 tracker
/usr/bin/fdfs_trackerd /etc/fdfs/tracker.conf停止 tracker 服务
fdfs_storaged /etc/fdfs/tracker.conf stop重启 tracker 服务
/usr/bin/fdfs_trackerd /etc/fdfs/tracker.conf restart查看是否有 tracker 进程
ps aux | grep tracker5.4 配置 storage
一般 storage 服务会单独安装,这里为了方便安装在同一台。
如果 storage 单独安装的话,上面安装的步骤也要重新跑一遍,配置时只配置 storage,不配置 tracker
复制一份配置文件
cp /etc/fdfs/storage.conf.sample /etc/fdfs/storage.conf创建storage存储目录
mkdir -p /opt/fastdfs/storage修改配置
vi /etc/fdfs/storage.conf # 数据存储目录地址
base_path=/opt/fastdfs/storage
# store_path#,从 0 开始编号,用于配置存储文件的目录
# 如果 store_path0 不存在,则它的值会被设为 base_path(不推荐这样做)
# 这些路径必须事先存在。
#
# 重要提示:
# store_path 的顺序非常重要,不要弄乱!
# base_path 应该是独立的(与 store_path 不同)
store_path0 = /opt/fastdfs/storage/storage0
#store_path1 = /opt/fastdfs/storage/storage1
# 设置tracker_server
tracker_server=192.168.1.114:221225.4.1 启动 storage
/usr/bin/fdfs_storaged /etc/fdfs/storage.conf首次启动会很慢,因为它在创建预设存储文件的目录
停止 storage 服务
fdfs_storaged /etc/fdfs/storage.conf stop重启 storage 服务
/usr/bin/fdfs_storaged /etc/fdfs/storage.conf restart查看是否有 storage 进程
ps aux | grep storage6 测试是否部署成功
利用自带的 client 进行测试
复制一份配置文件
cp /etc/fdfs/client.conf.sample /etc/fdfs/client.conf创建client数据目录
mkdir -p /opt/fastdfs/client编辑配置文件
vi /etc/fdfs/client.conf# 存储日志文件的基本路径
base_path=/data/fastdfs/client
# tracker server的列表
tracker_server=192.168.1.114:22122在终端中通过 shell 上传 opt 目录下的一张图片:
/usr/bin/fdfs_test /etc/fdfs/client.conf upload test.jpg如下图箭头所示,生成的图片地址为:http://192.168.1.114/group1/M00/00/00/wKgBclb0aqWAbVNrAAAjn7_h9gM813_big.jpg
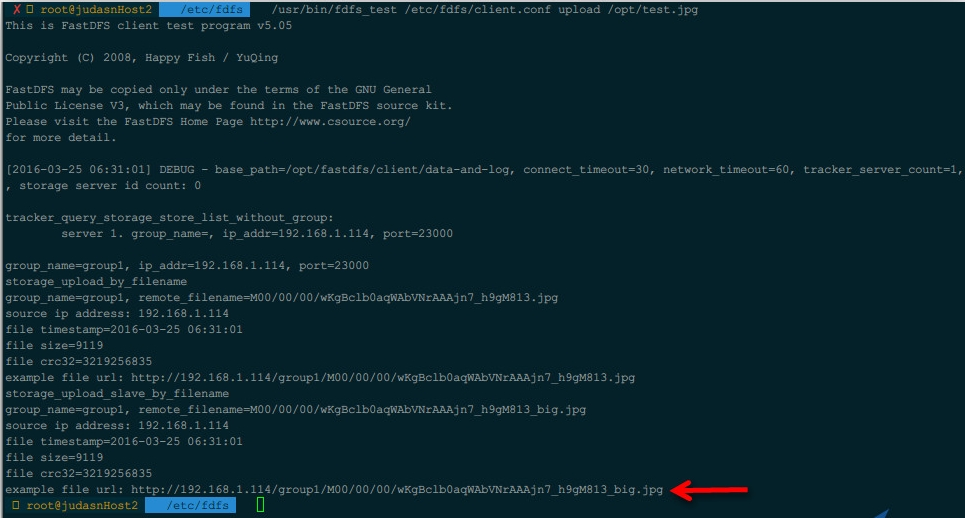
即使我们现在知道图片的访问地址我们也访问不了,因为我们还没装 FastDFS 的 Nginx 模块
上传成功后,在 目标文件夹会生成4个文件夹,有
_big的是备份文件,后缀名-m是文件的元数据
7 编译 nginx 添加 fastdfs-nginx-module
Nginx 添加模块需要重新编译,如果已有 ngxin 需要使用平滑升级的方式添加模块
下载源码
git clone -b V1.24 https://github.com/happyfish100/fastdfs-nginx-module.git --depth 1复制文件
cp fastdfs/conf/http.conf /etc/fdfs/http.conf
cp fastdfs/conf/mime.types /etc/fdfs/mime.types
cp /root/fastdfs-nginx-module/src/mod_fastdfs.conf /etc/fdfs/mod_fastdfs.conf
编辑 Nginx 模块的配置文件
在已启动 Nginx 的情况下修改内容需要重启 Nginx
vi /etc/fdfs/mod_fastdfs.conf#指定tracker服务器的IP和端口
tracker_server=192.168.1.114:22122
# store_path#,从 0 开始编号。如果 store_path0 不存在,则它的值默认为 base_path
# 这些路径必须事先存在
# 必须与 storage.conf 中的配置保持一致
store_path0 = /opt/fastdfs/storage/storage0
#store_path1 = /opt/fastdfs/storage/storage1解压 Nginx
tar zxf nginx-1.28.0.tar.gz
cd nginx-1.28.0
编译(注意最后一行)
./configure \
--prefix=/usr/local/nginx \
--add-module=/root/fastdfs-nginx-module/src
修改 Nginx 配置
user root;	# 注意这一行,如果有权限问题,使用 root 用户去运行 nginx
server {
	listen 80;
	server_name localtion;
	client_max_body_size 30m;
    location ~/group[0-9]/M0[0-9] {
        ngx_fastdfs_module;
        add_header Access-Control-Allow-Origin *;
8 fastdfs状态查询
/usr/bin/fdfs_monitor /etc/fdfs/client.conf

FDFS_STORAGE_STATUS:INIT      :初始化,尚未得到同步已有数据的源服务器
FDFS_STORAGE_STATUS:WAIT_SYNC :等待同步,已得到同步已有数据的源服务器
FDFS_STORAGE_STATUS:SYNCING   :同步中
FDFS_STORAGE_STATUS:DELETED   :已删除,该服务器从本组中摘除
FDFS_STORAGE_STATUS:OFFLINE   :离线
FDFS_STORAGE_STATUS:ONLINE    :在线,尚不能提供服务
FDFS_STORAGE_STATUS:ACTIVE    :在线,可以提供服务